うさラボ

お勉強と備忘録

作成したtemplateをntc-templatesにPRする

こちらは エーピーコミュニケーションズ Advent Calendar 2021 4日目の記事です qiita.com

はじめに

今年の個人的な目標はOSS参加でした。 結果的に数件ですがの活動ができました。
直近に実施したntc-templatesの追加について実施した内容をまとめてみました。

ことの発端

やったこと

新規テンプレートを作成して、ntc-templatesにプルリクエストを出します

github.com

前回の記事でテンプレートの作成を解説しています。 usage-automate.hatenablog.com

前回の記事で作成してshow ip nat translationsのテンプレートを改修してプルリクエストを出します。

OSSの参加自体あまり慣れてません、お作法的によろしくないことがあれば優しくおしらせください

手順

手順の流れはざっくりと以下になります。
1. Githubでの作業
2. ローカル(自端末)での作業
3. テンプレート作成
4. テスト作成
5. テスト
6. コミット&プッシュ
7. プルリクエスト作成
8. マージされる

1. Githubでの作業

ntc-templatesのリポジトリをフォークし作業をします。
まずは、右上のフォークボタンを押します。 f:id:usage_automate:20211203091503p:plain

フォーク後 f:id:usage_automate:20211203091605p:plain

ksaegusa/ntc-templatesになってますね これで準備完了で、ローカルで開発を始めます。

2. ローカル(自端末)での作業

フォークしたリポジトリをクローンしローカルでの作業を開始ます。

git clone https://github.com/ksaegusa/ntc-templates.git

ブランチの作成と移動

git branch add-cisco-show-ip-nat-translations
git checkout add-cisco-show-ip-nat-translations

ブランチ名は、ほかのコントリビュータの方を参考に命名しました。
※マージ済みのプルリクエストなどから雰囲気をつかむ。

3. テンプレート作成

show ip nat translationsのテンプレートを追加していきます。 さらにテンプレートとの紐付けが書かれているindexファイルの更新も合わせて実施します。

新規作成ファイル

  • ntc_templates/templates/cisco_ios_show_ip_nat_translations.textfsm
Value PROTOCOL (tcp|udp|icmp|---)
Value INSIDE_GLOBAL_IP (\d+\.\d+\.\d+\.\d+|---)
Value INSIDE_GLOBAL_PORT (\S+)
Value INSIDE_LOCAL_IP (\d+\.\d+\.\d+\.\d+|---)
Value INSIDE_LOCAL_PORT (\S+)
Value OUTSIDE_LOCAL_IP (\d+\.\d+\.\d+\.\d+|---)
Value OUTSIDE_LOCAL_PORT (\S+)
Value OUTSIDE_GLOBAL_IP (\d+\.\d+\.\d+\.\d+|---)
Value OUTSIDE_GLOBAL_PORT (\S+)

Start
  ^Pro\s+Inside\sglobal\s+Inside\slocal\s+Outside\slocal\s+Outside\sglobal
  ^${PROTOCOL}\s+${INSIDE_GLOBAL_IP}:${INSIDE_GLOBAL_PORT}\s+${INSIDE_LOCAL_IP}:${INSIDE_LOCAL_PORT}\s+${OUTSIDE_LOCAL_IP}:${OUTSIDE_GLOBAL_PORT}\s+${OUTSIDE_GLOBAL_IP}:${OUTSIDE_LOCAL_PORT} -> Record
  ^${PROTOCOL}\s+${INSIDE_GLOBAL_IP}\s+${INSIDE_LOCAL_IP}\s+${OUTSIDE_LOCAL_IP}\s+${OUTSIDE_GLOBAL_IP} -> Record

作成したテンプレートをtemplatesディレクトリ配下に格納します。 前回の記事で紹介したときよりパワーアップしています。

前回のテンプレートを使ったアウトプット
 - protocol: 'tcp'
   inside_global: '10.9.0.0:51776',
   inside_local: '10.1.0.2:51776',
   outside_global: '10.2.0.2:21',
   outside_local: '10.2.0.2:21',

今回のテンプレート
  - protocol: "tcp"
    inside_global_ip: "10.9.0.0"
    inside_global_port: "51776"
    inside_local_ip: "10.1.0.2"
    inside_local_port: "51776"
    outside_local_ip: "10.2.0.2"
    outside_local_port: "21"
    outside_global_ip: "10.2.0.2"
    outside_global_port: "21"

IPの情報とポートの情報がひとまとまりになってしまっていたのでこちらを分離できるようにしました。

修正ファイル

  • ntc_templates/templates/index
~snip~
cisco_ios_show_ipv6_interface_brief.textfsm, .*, cisco_ios, sh[[ow]] ipv[[6]] i[[nterface]] b[[rief]]
cisco_ios_show_ip_nat_translations.textfsm, .*, cisco_ios, sh[[ow]] ip nat translation[[s]]
cisco_ios_show_ip_eigrp_neighbors.textfsm, .*, cisco_ios, sh[[ow]] ip ei[[grp]] nei[[ghbors]]
~snip~

続いて、既存のファイルの更新をします。indexはコマンドとテンプレートを紐づけをするようファイルのようです。 READMEに更新の際の注意が書いてありました。

  • アルファベット順のOS
  • 長さ順にテンプレート名
  • 長さが同じ場合は、コマンド名のアルファベット順を使用してください
  • OS間のスペースを確保する

今回はcisco,iosのコマンド追加なのでcisco_ios_show_xxxが並んでいる部分に追記をします。その際テンプレート名の長い順に並べるようです。 cisco_ios_show_ipv6_interface_brief.textfsmとcisco_ios_show_ip_eigrp_neighbors.textfsmの間に追加したテンプレート情報を追加しました。

cisco_ios_show_ipv6_interface_brief.textfsm => 43文字
cisco_ios_show_ip_nat_translations.textfsm = > 42文字 ★この位置に差し込み
cisco_ios_show_ip_eigrp_neighbors.textfsm => 41文字

後半部分は、以下のルールになっているようです。

.*,ベンダ_OS, コマンド省略可能な個所

今回は省略可能な個所が開発時に理解できていなかったためsだけになってます。。
実際にはsh ip na tでもコマンドが通るため、下記のように書く方がよかったです。 f:id:usage_automate:20211204092607p:plain

cisco_ios_show_ip_nat_translations.textfsm, .*, cisco_ios, sh[[ow]] ip n[[at]] t[[ranslations]]

タイミングを見計らって直しちゃおうと思います。

これで、テンプレートの作成とindexの更新が完了です。

4. テスト作成

さて、今回は合わせてテストも書いてあげる必要があるようです。 testsディレクトリの配下にベンダ_OS命名で作成されたディレクトリがあります。さらにその配下にコマンド名でディレクトリを作成しその中に必要なファイルを用意します。 ほかのディレクトリを参考に、コマンド実行時に出力されたものを記載したファイル(.raw)とパース後の想定Yamlファイルを用意します。

新規作成

  • tests/cisco_ios/show_ip_nat_translations/show_ip_nat_translations.raw
Pro Inside global      Inside local       Outside local      Outside global
tcp 10.9.0.0:51776     10.1.0.2:51776     10.2.0.2:21        10.2.0.2:21
tcp 10.9.0.0:51778     10.1.0.2:51778     10.2.0.2:21        10.2.0.2:21
tcp 10.9.0.0:56384     10.1.0.2:56384     10.2.0.2:22        10.2.0.2:22
icmp 10.9.0.0:513     10.1.0.2:512     10.2.0.2:512        10.2.0.2:513
--- 10.9.0.0     10.1.0.2     ---        ---
  • tests/cisco_ios/show_ip_nat_translations/show_ip_nat_translations.yml
---
parsed_sample:
  - protocol: "tcp"
    inside_global_ip: "10.9.0.0"
    inside_global_port: "51776"
    inside_local_ip: "10.1.0.2"
    inside_local_port: "51776"
    outside_local_ip: "10.2.0.2"
    outside_local_port: "21"
    outside_global_ip: "10.2.0.2"
    outside_global_port: "21"
  - protocol: "tcp"
    inside_global_ip: "10.9.0.0"
    inside_global_port: "51778"
    inside_local_ip: "10.1.0.2"
    inside_local_port: "51778"
    outside_local_ip: "10.2.0.2"
    outside_local_port: "21"
    outside_global_ip: "10.2.0.2"
    outside_global_port: "21"
  - protocol: "tcp"
    inside_global_ip: "10.9.0.0"
    inside_global_port: "56384"
    inside_local_ip: "10.1.0.2"
    inside_local_port: "56384"
    outside_local_ip: "10.2.0.2"
    outside_local_port: "22"
    outside_global_ip: "10.2.0.2"
    outside_global_port: "22"
  - protocol: "icmp"
    inside_global_ip: "10.9.0.0"
    inside_global_port: "513"
    inside_local_ip: "10.1.0.2"
    inside_local_port: "512"
    outside_local_ip: "10.2.0.2"
    outside_local_port: "513"
    outside_global_ip: "10.2.0.2"
    outside_global_port: "512"
  - protocol: "---"
    inside_global_ip: "10.9.0.0"
    inside_global_port: ""
    inside_local_ip: "10.1.0.2"
    inside_local_port: ""
    outside_local_ip: "---"
    outside_local_port: ""
    outside_global_ip: "---"
    outside_global_port: ""

5. テスト

プッシュする前にローカルでテストを実施します。 実施しるためにtoxをインストールしておく必要があります。

pip install tox

テストの実行

tox

テストが開始され、いろいろとテストしてくれてますかっこいいですね(アホ)
f:id:usage_automate:20211203181225p:plain

すべてPASSになったことを確認します
f:id:usage_automate:20211203181426p:plain

これでテストは完了です、テスト実施に出来上がるキャッシュファイルや.toxはすべて削除しました。 (毎回手で削除する必要なさそうだけどよくわからず。)

この時、Lintも同時行ってくれます、テストが通るまで根気よく修正します。

6. コミット&プッシュ

git add .
git commit -m 'add show ip nat translations template'
git push origin add-cisco-show-ip-nat-translations

7. プルリクエスト作成

プッシュが完了したらGithubでプルリクエストを作成します、この時マージ先はntc-templates/masterになります。 github.com

プルリクエストを作成するとCIが走るようになっているようです。 この時、なぜ更新をかけていない箇所でCIのエラーが出てしまいました。
ローカルのテストでは引っかからなかったためプルリクエストのコメントでレビュアーに確認しました。

何やらmasterにバグがあったのか、再現性があったりなかったりで暫定的な対応をしてもらいいったん解決

バグの修正をしてもらい、コメントをしつつマージをされるのを待ちました。

8. マージされた

そして、マージされました。めでたしめでたし。

f:id:usage_automate:20211203184036p:plain

次回?のバージョンにも追加されるようです。

まとめ

フォークするところからマージまで一連の手順を書きました。
実際には何度もlintで引っかかったり、別のエラーがでたりでそこまでスムーズではなかったですが、流れがなんとなくでもつかんでもらえれば幸いです。

今年から始めたOSS活動ですが、少しづつ、ほんとに少しづつですができることが増えてきました。
来年は2桁マージを目指したいなと思います。

TTP(Text Template Paser)入門

やりたかったこと

前回、ntc-templateの自作に入門したので今回は同じ内容を別のパーサーで試してみます。
やることはshow ip nat translationsのパースです。

公式ドキュメント ttp.readthedocs.io

Github github.com

参考にさせていただいたブログ zaki-hmkc.hatenablog.com

準備

環境

python
* Python 3.9.6

ライブラリ
* ansible-core==2.12.0 * ttp==0.8.1

コレクション
* ansible.netcommon 2.4.0
* ansible.utils 2.4.2

実装

まずは公式ドキュメントのQuick startにあるスクリプト動かして確認を使い方を確認をします。

from ttp import ttp

data_to_parse = """
interface Loopback0
 description Router-id-loopback
 ip address 192.168.0.113/24
!
interface Vlan778
 description CPE_Acces_Vlan
 ip address 2002::fd37/124
 ip vrf CPE1
!
"""

ttp_template = """
interface {{ interface }}
 ip address {{ ip }}/{{ mask }}
 description {{ description }}
 ip vrf {{ vrf }}
"""

# create parser object and parse data using template:
parser = ttp(data=data_to_parse, template=ttp_template)
parser.parse()

# print result in JSON format
results = parser.result(format='json')[0]
print(results)

# or in csv format
csv_results = parser.result(format='csv')[0]
print(csv_results)

パース前のデータをdata_to_parseに格納、ttp_templateでパースをします。
result表示の際にformatの指定もできるようです。

実行してみます。

ttp# python sample.py 
# format JSON
[
    [
        {
            "description": "Router-id-loopback",
            "interface": "Loopback0",
            "ip": "192.168.0.113",
            "mask": "24"
        },
        {
            "description": "CPE_Acces_Vlan",
            "interface": "Vlan778",
            "ip": "2002::fd37",
            "mask": "124",
            "vrf": "CPE1"
        }
    ]
]

# format CSV
"description","interface","ip","mask","vrf"
"Router-id-loopback","Loopback0","192.168.0.113","24",""
"CPE_Acces_Vlan","Vlan778","2002::fd37","124","CPE1"

JSONCSVになったデータが表示されました。

テンプレート部分に注目をすると使い方のイメージがつくと思います。 出力結果を抜き出して変数として登録するようなテンプレートを作成します。

# Templateファイル
interface {{ interface }}
 ip address {{ ip }}/{{ mask }}
 description {{ description }}
 ip vrf {{ vrf }}

# パース前
interface Vlan778
 description CPE_Acces_Vlan
 ip address 2002::fd37/124
 ip vrf CPE1

# パース後
{
    "description": "CPE_Acces_Vlan",
    "interface": "Vlan778",
    "ip": "2002::fd37",
    "mask": "124",
    "vrf": "CPE1"
}

ある程度テンプレートも用意されているようです。 github.com

それでは他のテンプレートを参考にshow ip nat translationsのパーサーを作成します。 show ip nat translationsの結果は以下です。

Pro Inside global      Inside local       Outside local      Outside global
tcp 10.9.0.0:51776     10.1.0.2:51776     10.2.0.2:21        10.2.0.2:21
tcp 10.9.0.0:51778     10.1.0.2:51778     10.2.0.2:21        10.2.0.2:21
tcp 10.9.0.0:56384     10.1.0.2:56384     10.2.0.2:22        10.2.0.2:22
icmp 10.9.0.0:56111     10.1.0.2:56384     10.2.0.2:23        10.2.0.2:23
--- 10.9.0.0     10.1.0.2     ---        ---
--- 10.9.0.1     10.1.0.3     ---        ---

Pro以外の要素はipip:portのルールで表記されています。
IPのみで表記されているのがstatic natになる想定なので、テンプレートでマッチする条件を調整します。

# dynamic natのエントリー
tcp 10.9.0.0:51776     10.1.0.2:51776     10.2.0.2:21        10.2.0.2:21

# static natのエントリー
--- 10.9.0.0     10.1.0.2     ---        ---

作成したテンプレートが以下です。

<group name="dynamic_nat">
{{ protocol }} {{ inside_global_ip }}:{{ inside_global_port }} {{ inside_local_ip }}:{{ inside_local_port }} {{ outside_local_ip }}:{{ outside_local_port }} {{ outside_global_ip }}:{{ outside_global_port }}
</group>

<group name="static_nat">
{{ protocol }} {{ inside_global_ip | re("(\S+)(?!.*:)") }} {{ inside_local_ip | re("(\S+)(?!.*:)") }} {{ outside_local_ip | re("(\S+)(?!.*:)") }} {{ outside_global_ip | re("(\S+)(?!.*:)") }}
</group>

でくくることでdynamicとstaticを別のグループにしています。 static_natのグループでは:が表示結果に含まれていないことを条件にしました。

今回はanisbleでパースをします、templatesディレクトリにテンプレートファイルを配置します。

.
├── sample.yml
└── templates
    └── ios_show_ip_nat_translations.ttp <--作成したパーサー

ansible-playbookを作成します。 ansible.utiles.cli_parseを利用します。 tempalte_pathはなぜかtemplates配下を見に行ってくれなかったのでplaybookのある階層からtemplateファイルを指定しています。

---
- name: Test Template Text Parser
  hosts: localhost
  gather_facts: false

  tasks:
    - name: parse
      ansible.utils.cli_parse:
        text: |-
          Pro Inside global      Inside local       Outside local      Outside global
          tcp 10.9.0.0:51776     10.1.0.2:51776     10.2.0.2:21        10.2.0.2:21
          tcp 10.9.0.0:51778     10.1.0.2:51778     10.2.0.2:21        10.2.0.2:21
          tcp 10.9.0.0:56384     10.1.0.2:56384     10.2.0.2:22        10.2.0.2:22
          icmp 10.9.0.0:56111     10.1.0.2:56384     10.2.0.2:23        10.2.0.2:23
          --- 10.9.0.0     10.1.0.2     ---        ---
          --- 10.9.0.1     10.1.0.3     ---        ---
        parser:
          name: ansible.netcommon.ttp
          template_path: ./templates/ios_show_ip_nat_translations.ttp
      register: res_parsed

    - name: debug
      debug:
        msg: "{{ res_parsed.parsed[0][0] }}"

確認

ansible-playbookを実行して動作を確認します。

PLAY [Test Template Text Parser] *****************************************************************************************************************************

TASK [parse] *************************************************************************************************************************************************
[WARNING]: Use 'ansible.utils.ttp' for parser name instead of 'ansible.netcommon.ttp'. This feature will be removed from 'ansible.netcommon' collection in a
release after 2022-11-01
ok: [localhost]

TASK [debug] *************************************************************************************************************************************************
ok: [localhost] => {
    "msg": {
        "dynamic_nat": [
            {
                "inside_global_ip": "10.9.0.0",
                "inside_global_port": "51776",
                "inside_local_ip": "10.1.0.2",
                "inside_local_port": "51776",
                "outside_global_ip": "10.2.0.2",
                "outside_global_port": "21",
                "outside_local_ip": "10.2.0.2",
                "outside_local_port": "21",
                "protocol": "tcp"
            },
            {
                "inside_global_ip": "10.9.0.0",
                "inside_global_port": "51778",
                "inside_local_ip": "10.1.0.2",
                "inside_local_port": "51778",
                "outside_global_ip": "10.2.0.2",
                "outside_global_port": "21",
                "outside_local_ip": "10.2.0.2",
                "outside_local_port": "21",
                "protocol": "tcp"
            },
            {
                "inside_global_ip": "10.9.0.0",
                "inside_global_port": "56384",
                "inside_local_ip": "10.1.0.2",
                "inside_local_port": "56384",
                "outside_global_ip": "10.2.0.2",
                "outside_global_port": "22",
                "outside_local_ip": "10.2.0.2",
                "outside_local_port": "22",
                "protocol": "tcp"
            },
            {
                "inside_global_ip": "10.9.0.0",
                "inside_global_port": "56111",
                "inside_local_ip": "10.1.0.2",
                "inside_local_port": "56384",
                "outside_global_ip": "10.2.0.2",
                "outside_global_port": "23",
                "outside_local_ip": "10.2.0.2",
                "outside_local_port": "23",
                "protocol": "icmp"
            }
        ],
        "static_nat": [
            {
                "inside_global_ip": "10.9.0.0",
                "inside_local_ip": "10.1.0.2",
                "outside_global_ip": "---",
                "outside_local_ip": "---",
                "protocol": "---"
            },
            {
                "inside_global_ip": "10.9.0.1",
                "inside_local_ip": "10.1.0.3",
                "outside_global_ip": "---",
                "outside_local_ip": "---",
                "protocol": "---"
            }
        ]
    }
}

PLAY RECAP ***************************************************************************************************************************************************
localhost                  : ok=2    changed=0    unreachable=0    failed=0    skipped=0    rescued=0    ignored=0   

パースされ、想定通りの結果を得ることができました。 dynamic_natグループはポートの情報も分けて取得することができています。

パース後の要素が2個以上ある場合は自動的にリストになるようです。要素が1個の場合リストにならないため、パース後に呼び出す際に注意が必要です。
テンプレートの書き方を調整すれば常にリストになるようにできるかもしれません。(※)

(※) 2021/12/16更新 解決方法が分かりました usage-automate.hatenablog.com

パース後の結果がけっこう深い階層にあったのがよくわからなかったですが、動作としては問題なかったです。res_parsed.parsed[0][0]

まとめ

TTP入門してみました。テンプレートがとても簡単に作れることができ、かなり便利です。
テンプレート自作ができるようになるとCLIの機器自動化でできることがかなり増えます、よければ参考にしてください。

ntc-template自作入門

ntc-templateにほしいパーサーがなかったので自作入門してみました。

やりたかったこと

show ip nat translationsを実行したときに想定通りのStaticNATのエントリーが見たい

準備

環境
python

ライブラリ

  • textfsm==1.1.2
  • ntc-templates==2.1.0

公式ドキュメントを参考に準備を開始 github.com

自作のテンプレートを格納するディレクトを作成 /templates

テンプレートの名前は下記の規則で作ってねと説明ありました。
{{ vendor_os }}_{{ command_with_underscores }}.textfsm

今回はiosのshow ip nat translationsの結果をパースするテンプレートのため、 ほかのテンプレートを参考にcisco_ios_show_ip_nat_translations.textfsmとしました。

実装

テンプレートの作成を始めます。

今回想定しているshow ip nat translationsの結果が以下になります。
StaticNATのInside globalとInside locaが想定通りであるか?の確認をするためにパースします。
StaticNATのエントリとしては最後の行が該当します。

  Pro Inside global      Inside local       Outside local      Outside global
  tcp 10.9.0.0:51776     10.1.0.2:51776     10.2.0.2:21        10.2.0.2:21
  tcp 10.9.0.0:51778     10.1.0.2:51778     10.2.0.2:21        10.2.0.2:21
  tcp 10.9.0.0:56384     10.1.0.2:56384     10.2.0.2:22        10.2.0.2:22
  icmp 10.9.0.0:56111     10.1.0.2:56384     10.2.0.2:23        10.2.0.2:23
  --- 10.9.0.0     10.1.0.2     ---        ---

ntc-template(textfsm)で対象の文字列を取得するのは正規表現でマッチさせる必要があります。
正規表現の書き方を確認するには下記サイトなどを利用しています。(機微な情報は載せないように気を付けてください) regex101.com

正規表現やほかのテンプレートを参考に下記テンプレートを作成しました

Value PROTOCOL (tcp|udp|icmp|---)
Value INSIDE_GLOBAL (\S+)
Value INSIDE_LOCAL (\S+)
Value OUTSIDE_LOCAL (\S+)
Value OUTSIDE_GLOBAL (\S+)

Start
  ^${PROTOCOL}\s+${INSIDE_GLOBAL}\s+${INSIDE_LOCAL}\s+${OUTSIDE_LOCAL}\s+${OUTSIDE_GLOBAL} -> Record

Valueにはパース後のキーを定義します。
key名と(ヒットさせる条件)の間にはスペースが必要です。 Value key名 (ヒットさせる条件)

テキストの解析処理はStartから始まります。
今回は^${PROTOCOL}\s・・・をキーに解析を始めます。
PROTOCOLはtcpudpかicmpか---が入る想定なのでカラムを除いたステータスの部分にマッチします。 f:id:usage_automate:20211111205641p:plain

そのほかのINSIDE_GLOBALなどは(\S+)のルールで空白以外の文字列をマッチさせています。
Pro Inside global Inside local Outside local Outside globalのカラムもマッチしていますがパース対象の文字列として含まれないように調整しています。 f:id:usage_automate:20211111212050p:plain

本来であれば、PATしている情報(IP:Portなどを値)も扱いやすいようにIPとPort分けて保存したほうがいいかもしれませんが、StaticNATの確認はこのテンプレートで十分できるのでここで終了します。

indexに今回追加したテンプレートを呼び出すルールを記載します。
これが必要なことに気づかず時間を結構食ってしまいました。。 templates/index

Template, Hostname, Platform, Command

cisco_ios_show_ip_nat_translations.textfsm, .*, cisco_ios, sh[[ow]] ip nat translations

確認

作成したテンプレートを動かすPythonスクリプトを作成します。

import os
import pprint
from ntc_templates.parse import parse_output # (1)

os.environ["NTC_TEMPLATES_DIR"] = "./templates" # (2)

output1 = (
  "Pro Inside global      Inside local       Outside local      Outside global\n"
  "tcp 10.9.0.0:51776     10.1.0.2:51776     10.2.0.2:21        10.2.0.2:21\n"
  "tcp 10.9.0.0:51778     10.1.0.2:51778     10.2.0.2:21        10.2.0.2:21\n"
  "tcp 10.9.0.0:56384     10.1.0.2:56384     10.2.0.2:22        10.2.0.2:22\n"
  "icmp 10.9.0.0:56111     10.1.0.2:56384     10.2.0.2:23        10.2.0.2:23\n"
  "--- 10.9.0.0     10.1.0.2     ---        ---\n"
) # (3)

parsed = parse_output(platform="cisco_ios",
                      command="show ip nat translations",
                      data=output1) # (4)

pprint.pprint(parsed) # (5)

1) ntc_templates.parseにあるparse_outputを読み込みます。
2) テンプレートを格納しているディレクトを指定します。
3) 想定のアウトプットを格納します。
4) パース処理を実行します、platform,command,dataを定義します。
5) 実行結果を表示します。

スクリプトを実行します。

sandbox# python nat_parser.py 
[{'inside_global': '10.9.0.0:51776',
  'inside_local': '10.1.0.2:51776',
  'outside_global': '10.2.0.2:21',
  'outside_local': '10.2.0.2:21',
  'protocol': 'tcp'},
 {'inside_global': '10.9.0.0:51778',
  'inside_local': '10.1.0.2:51778',
  'outside_global': '10.2.0.2:21',
  'outside_local': '10.2.0.2:21',
  'protocol': 'tcp'},
 {'inside_global': '10.9.0.0:56384',
  'inside_local': '10.1.0.2:56384',
  'outside_global': '10.2.0.2:22',
  'outside_local': '10.2.0.2:22',
  'protocol': 'tcp'},
 {'inside_global': '10.9.0.0:56111',
  'inside_local': '10.1.0.2:56384',
  'outside_global': '10.2.0.2:23',
  'outside_local': '10.2.0.2:23',
  'protocol': 'icmp'},
 {'inside_global': '10.9.0.0',
  'inside_local': '10.1.0.2',
  'outside_global': '---',
  'outside_local': '---',
  'protocol': '---'}]

無事にパースができました。
StaticNATのエントリはprotocl/outside_global/outside_localが---になるので下記の要素を確認します。

 {'inside_global': '10.9.0.0',
  'inside_local': '10.1.0.2',
  'outside_global': '---',
  'outside_local': '---',
  'protocol': '---'}]

パースがうまくできているので後はassertなどで結果の判断が簡単にできます。

まとめ

簡単なテンプレートでしたが、ntc-templateを自作することができました。
今回やったことは本当に入門レベルでntc-templateは複雑なテキストをパースすることも可能です。

自作したntc-templateをansibleに読み込ませてわちゃわちゃしたいと思います。

また、TTPパーサーも自作をしたのでいつか記事にします。

ansible-builderとansible-runnerを試してみた

はじめに

anible-runnerとansible-builderは名前こそ聞いたことがあったが触ったことがありませんでした。
Pythonスクリプトからansibleを動かしたいなと考えたときに、ansible-runnerが使えるという情報をいただいたので入門してみました。
まずは手始めにansible-builderで作成したコンテナをansible-runnerで動かすのをやってみようと思います。

ansible-builder

Ansible BuilderはAnsibleの実行環境をコンテナで用意するためのPythonモジュール

ansible-runner

Ansible Runnerは、コンテナを介してPlaybookを起動したり
Pythonスクリプトなどに組み込むことで直接Ansibleの起動が可能になるPythonモジュール

前提条件

コンテナの実行環境を事前に準備しておく必要があります

  • Docker
  • Podman

私は事前にDocekrをインストールしておきました。

インストール

ansible-builder/ansible-runnerはpipでインストールが可能です。

$ pip install ansible-builder
$ pip install ansible-runner

Anibleのインストールは不要です

$ pip freeze | grep ansible

ansible-builder==1.0.1
ansible-runner==2.0.1

Build環境の準備

まず、初めにansible-builderを使って実行環境のコンテナ(execution-environment)の設定を定義したファイルを作成します

execution-environment.yml

---
version: 1.1
dependencies:
  galaxy: requirements.yml
  python: requirements.txt

additional_build_steps:
  prepend: |
    RUN pip3 install --upgrade pip setuptools
  append:
    - RUN ls -la /etc

dependenciesのgalaxy/pythonで定義したrequirementsファイルを作成していきます additional_build_stepsでBuild時に実施するコマンドを定義できます
(ここでansibleを削除し、任意のVersionをインストールしようとしましたが失敗してしまいました、、本筋ではないので省略します)

pythonのライブラリをインストールするためにrequirements.txtを作成する(中身は適当です)

requirements.txt.yml

paramiko
jmespath
netaddr

インストールするCollectionなどを記載するrequirements.ymlを作成します

requirements.yml

---
collections:
  - name: ansible.netcommon
  - name: ansible.utils

Build

事前のDocker Imagesを確認

$ docker images
REPOSITORY   TAG       IMAGE ID   CREATED   SIZE

Build(数分かかります)

$ ansible-builder build --tag ee001
Running command:
  docker build -f context/Dockerfile -t ee001 context
Complete! The build context can be found at: /home/xx/xx/context

オプション--verbosityを利用することでログを表示が可能です

また、コマンド実行時にcontextディレクトが作成されDockerfileやrequirements.txtなどが格納されます
--contextを指定することで任意のPATHに作成が可能です

--build-arg EE_BASE_IMAGEオプションを指定するとpullするイメージファイルを選べるようです
※ただし、初めからansibleが入っているimageじゃないと動かなさそう・・

オプション付きBuild

$ ansible-builder build --tag ee002 --verbosity 3 --context tmp
Ansible Builder is building your execution environment image, "ee002".
File tmp/_build/requirements.yml will be created.
File tmp/_build/requirements.txt will be created.
File tmp/_build/ansible.cfg will be created.
Rewriting Containerfile to capture collection requirements
Running command:
  docker build -f tmp/Dockerfile -t ee002 tmp
Sending build context to Docker daemon  6.656kB
Step 1/22 : ARG EE_BASE_IMAGE=quay.io/ansible/ansible-runner:latest
Step 2/22 : ARG EE_BUILDER_IMAGE=quay.io/ansible/ansible-builder:latest
Step 3/22 : FROM $EE_BASE_IMAGE as galaxy
 ---> 7f28c304a37a
Step 4/22 : ARG ANSIBLE_GALAXY_CLI_COLLECTION_OPTS=
 ---> Using cache
 ---> 817d228223c7
Step 5/22 : USER root
 ---> Using cache
 ---> abe073792147
Step 6/22 : ADD _build/ansible.cfg ~/.ansible.cfg
 ---> Using cache
 ---> 86f235ef5837
Step 7/22 : ADD _build /build
 ---> Using cache
 ---> 1d4ae1669f34
Step 8/22 : WORKDIR /build
 ---> Using cache
 ---> 3222fad0e2e6
Step 9/22 : RUN ansible-galaxy role install -r requirements.yml --roles-path /usr/share/ansible/roles
 ---> Using cache
 ---> c43f05572389
Step 10/22 : RUN ansible-galaxy collection install $ANSIBLE_GALAXY_CLI_COLLECTION_OPTS -r requirements.yml --collections-path /usr/share/ansible/collections
 ---> Using cache
 ---> 714d46cd3e58
Step 11/22 : FROM $EE_BUILDER_IMAGE as builder
 ---> 5806c16c9ae2
Step 12/22 : COPY --from=galaxy /usr/share/ansible /usr/share/ansible
 ---> Using cache
 ---> 6348ad77818a
Step 13/22 : ADD _build/requirements.txt requirements.txt
 ---> Using cache
 ---> 555ce006fb1c
Step 14/22 : RUN ansible-builder introspect --sanitize --user-pip=requirements.txt --write-bindep=/tmp/src/bindep.txt --write-pip=/tmp/src/requirements.txt
 ---> Using cache
 ---> 29d5ad112a18
Step 15/22 : RUN assemble
 ---> Using cache
 ---> 2bcba19d4f70
Step 16/22 : FROM $EE_BASE_IMAGE
 ---> 7f28c304a37a
Step 17/22 : USER root
 ---> Using cache
 ---> a8ea1ddb1c81
Step 18/22 : RUN pip3 install --upgrade pip setuptools
 ---> Using cache
 ---> 342d9b393f12
Step 19/22 : COPY --from=galaxy /usr/share/ansible /usr/share/ansible
 ---> Using cache
 ---> 5a355f923a51
Step 20/22 : COPY --from=builder /output/ /output/
 ---> Using cache
 ---> 2f14d46eac3e
Step 21/22 : RUN /output/install-from-bindep && rm -rf /output/wheels
 ---> Using cache
 ---> b86981d1e55f
Step 22/22 : RUN ls -la /etc
 ---> Using cache
 ---> e94c237fcda9
Successfully built e94c237fcda9
Successfully tagged ee002:latest

Complete! The build context can be found at: /home/xx/xx/tmp

tmpにDokcerfileなどが格納されます

imagesを確認すると、指定したtagでimageが作成されたことが確認できます
(ついでにいろいろ増えているのはよくわからないですが、、、)

$ docker images
REPOSITORY                        TAG       IMAGE ID       CREATED         SIZE
ee001                             latest    e94c237fcda9   4 minutes ago   741MB
ee002                             latest    e94c237fcda9   4 minutes ago   741MB
<none>                            <none>    2bcba19d4f70   4 minutes ago   779MB
<none>                            <none>    714d46cd3e58   6 minutes ago   708MB
quay.io/ansible/ansible-runner    latest    7f28c304a37a   8 hours ago     703MB
quay.io/ansible/ansible-builder   latest    5806c16c9ae2   8 hours ago     611MB

runner環境準備

imageができたのでansible-runnerを動かしてみます

ansible-runnerは利用前に下記2個のディレクトリを作成します

  • env: runnerの実行のために必要な設定を格納する
  • project: playbookやinventoryを格納する

ansible-runnerを実行時には/projectsの配下を見に行くようで、projectsディレクトリを作成しその配下にPlaybookを配置する必要があるようです

xxx
├── env
│   └── settings
└── project
    └── playbooks
        └── sample001.yml

env/settingsで実行対象のimagesファイルの指定などを行っています process_isolationはプレイブックを実行するファイルシステム上のどのディレクトリにアクセスできるかを制限するものらしいです
(Towerでいうところの分離されたジョブってところがイメージ近いかな?)

container_image: ee001  <--ここでBuilderで作成したImageを指定
process_isolation_executable: docker
process_isolation: true

ここで実行対象のコンテナイメージを指定しなかった場合quay.io/ansible/ansible-runner:deveというimageが自動的にダウンロードされ実行されます
runner実行時に--container-imageオプションを使っても指定可能です。
settingに対象イメージを書いていると--container-imageオプションよりも優先されるような動きをしました

用意したPlaybookはLocalhostに対してコマンドを実行するシンプルなものです
(おまけで最後にcollectionsで追加したnetcommonが使えるか確認しています)

sample001.yml

---
- hosts: localhost
  connection: local
  gather_facts: false

  tasks:
    - name: send command
      command: ansible --version
      register: res_version

    - name: debug version
      debug:
        msg: "{{ res_version.stdout_lines }}"

    - name: send command
      command: ansible-galaxy collection list
      register: res_collections

    - name: debug version
      debug:
        msg: "{{ res_collections.stdout_lines }}"

    - name: send command
      command: pip freeze
      register: res_pip_freeze

    - name: debug version
      debug:
        msg: "{{ res_pip_freeze.stdout_lines }}"

    - name: debug ip
      debug:
        msg: "{{ ip | ansible.netcommon.ipv4 }}"
      vars:
        ip: '192.168.1.1/32'

runner実行

それでは実行をしてみます ansible-runner run コマンドで実行します runの後はprojectが格納されているディレクトリを指定し、-pでplaybookを指定します
runnerはprojectディレクトリにあるファイルを参照するので、少し注意が必要です。
ここで-p project/playbooks/sample001.ymlのようにパスを指定してしまうと失敗してしまいます。

$ ansible-runner run . -p playbooks/sample001.yml
[WARNING]: Unable to parse /runner/inventory/hosts as an inventory source
[WARNING]: No inventory was parsed, only implicit localhost is available
[WARNING]: provided hosts list is empty, only localhost is available. Note that
the implicit localhost does not match 'all'

PLAY [localhost] ***************************************************************

TASK [send command1] ***********************************************************
changed: [localhost]

TASK [debug version] ***********************************************************
ok: [localhost] => {
    "msg": [
        "ansible [core 2.11.3rc1.post0] ",
        "  config file = None",
        "  configured module search path = ['/home/runner/.ansible/plugins/modules', '/usr/share/ansible/plugins/modules']",
        "  ansible python module location = /usr/local/lib/python3.8/site-packages/ansible",
        "  ansible collection location = /home/runner/.ansible/collections:/usr/share/ansible/collections",
        "  executable location = /usr/local/bin/ansible",
        "  python version = 3.8.6 (default, Jan 29 2021, 17:38:16) [GCC 8.4.1 20200928 (Red Hat 8.4.1-1)]",
        "  jinja version = 2.10.3",
        "  libyaml = True"
    ]
}

TASK [send command2] ***********************************************************
changed: [localhost]

TASK [debug collection] ********************************************************
ok: [localhost] => {
    "msg": [
        "",
        "# /usr/share/ansible/collections/ansible_collections",
        "Collection        Version",
        "----------------- -------",
        "ansible.netcommon 2.2.0  ",
        "ansible.utils     2.3.0  "
    ]
}

TASK [send command3] ***********************************************************
changed: [localhost]

TASK [debug pip freeze] ********************************************************
ok: [localhost] => {
    "msg": [
        "ansible-core @ file:///output/wheels/ansible_core-2.11.3rc1.post0-py3-none-any.whl",
        "ansible-pylibssh==0.2.0",
        "ansible-runner @ file:///output/wheels/ansible_runner-2.0.0.0a4.dev61-py3-none-any.whl",
        "asn1crypto==1.2.0",
        "attrs==21.2.0",
        "Babel==2.7.0",
        "bcrypt==3.2.0",
        "cffi==1.13.2",
        "chardet==3.0.4",
        "cryptography==2.8",
        "decorator==5.0.9",
        "docutils==0.17.1",
        "dumb-init==1.2.5",
        "future==0.18.2",
        "gssapi==1.6.14",
        "idna==2.8",
        "Jinja2==2.10.3",
        "jmespath==0.10.0",
        "jsonschema==3.2.0",
        "jxmlease==1.0.3",
        "lockfile==0.12.2",
        "lxml==4.4.1",
        "MarkupSafe==1.1.1",
        "ncclient==0.6.12",
        "netaddr==0.8.0",
        "ntlm-auth==1.5.0",
        "packaging==21.0",
        "paramiko==2.7.2",
        "pexpect==4.8.0",
        "ply==3.11",
        "ptyprocess==0.7.0",
        "pyasn1==0.4.8",
        "pycparser==2.19",
        "pykerberos==1.2.1",
        "PyNaCl==1.4.0",
        "pyOpenSSL==19.1.0",
        "pyparsing==2.4.7",
        "pypsrp==0.5.0",
        "pyrsistent==0.18.0",
        "PySocks==1.7.1",
        "pyspnego==0.1.6",
        "python-daemon==2.3.0",
        "pytz==2019.3",
        "pywinrm==0.4.2",
        "PyYAML==5.4.1",
        "requests==2.22.0",
        "requests-credssp==1.2.0",
        "requests-ntlm==1.1.0",
        "resolvelib==0.5.4",
        "six==1.12.0",
        "textfsm==1.1.2",
        "toml==0.10.2",
        "ttp==0.7.1",
        "urllib3==1.25.7",
        "xmltodict==0.12.0"
    ]
}

TASK [debug ip] ****************************************************************
ok: [localhost] => {
    "msg": "192.168.1.1/32"
}

PLAY RECAP *********************************************************************
localhost                  : ok=7    changed=3    unreachable=0    failed=0    skipped=0    rescued=0    ignored=0    

正常に完了しました
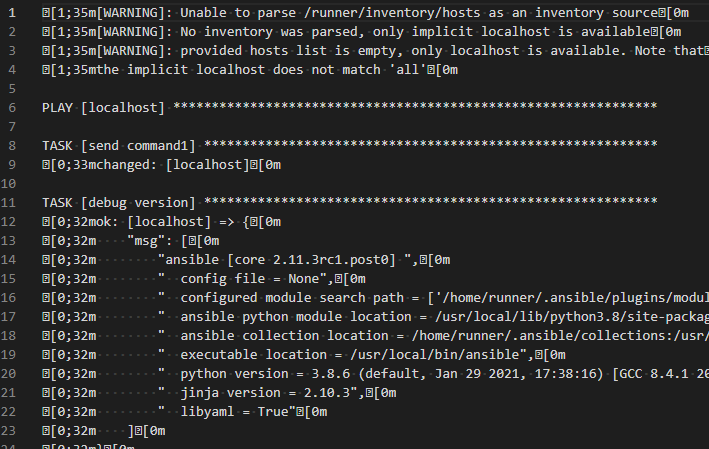
完了すると、artifactsディレクトリが生成され、その中に実行結果やjob_eventが表示されます
stdoutを見るとAnsibleで実行した結果が見れるのですが、色コード?のようなものが入ってしまって見にくいです。。

f:id:usage_automate:20210715174142p:plain

まとめ

ansible-builderとansible-runnerに入門してみました
コンテナイメージを作成しておいて、実行時だけ起動するというのはとてもスマートだなと感じました
venvを切ってライブラリを・・・と今まで当たり前のようにやっていましたが、builderとrunnerを利用して簡単に環境のセットアップができるようになれば良いなと思います。

いまいちわからなかったのが、ansibleを任意のVersionで実行したい場合。。こちら継続で調べたいと思います・・

次回はPythonスクリプトにansible-runnerを組み込んでみる

公式Docs

ansible-runner.readthedocs.io ansible-builder.readthedocs.io

AnsibleでNetboxを触るときのTIPS

Netboxのおさらい

IPAM機能(IP/PREFIX/VLAN/VRF)とDCIM機能(Device/Rack/Power/Cable) を兼ねそろえたOSSのWebツール
できることは以下

  • IPアドレス管理(IPAM) -IPネットワークとアドレス、VRF、およびVLAN
  • 機器ラック-グループおよびサイトごとに整理
  • バイス-デバイスの種類とインストール場所
  • 接続-デバイス間のネットワーク、コンソール、および電源接続
  • 仮想化-仮想マシンクラスタ
  • データ回線-長距離通信回線およびプロバイダー
  • シークレット-機密性の高いクレデンシャルの暗号化されたストレージ

Netboxでできないこと

スコープ外の機能、ほかのツールと組み合わせて使うよいもの

  • 構成管理
  • DNSサーバー
  • RADIUSサーバー
  • 構成管理
  • 要員派遣

構成管理はlocal_contextなど使えばできないこともなさそうだなぁとは思ったり

リポジトリ
github.com

ドキュメント
netbox.readthedocs.io

環境

Netbox 2.10 (https://netboxdemo.com/)デモ環境
Ansible 2.10
pynetbox 5.3.1

準備

  • pynetboxのライブラリが必要なのでインストール pip install pynetbox 実施
  • netbox collectionのインストール ansible-galaxy collection install netbox.netbox 実施
  • netboxでAPIトークンを作成
    f:id:usage_automate:20210426215341p:plain

  • URLとTokenは変数として格納しておく(netbox_url/netbox_token)

自動払い出し機能付きモジュールの使い方

netbox_prefix

sampleのタスクを下記に記載
ポイントは parentfirst_available
親セグメントから余りのprefixを払い出してくれる。
(192.168.0.0/24から/28を払い出す)

- name: create prefix
  netbox.netbox.netbox_prefix:
    netbox_url: "{{ netbox_url }}"
    netbox_token: "{{ netbox_token }}"
    validate_certs: false
    data:
      parent: "{{ prefix }}"
      prefix_length: "{{ prefix_length }}"
    state: present
    first_available: true
  vars:
    prefix: 192.168.0.0/24
    prefix_length: 28

ちなみに払い出せない場合はSKIPになる

netbox_ip_address

sampleplaybookを下記に記載
こちらは state: new にすることでprefix内からipaddressを払い出してくれる

- name: "Address payout "
  netbox.netbox.netbox_ip_address:
    netbox_url: "{{ netbox_url }}"
    netbox_token: "{{ netbox_token }}"
    validate_certs: false
    data:
      prefix: "{{ prefix }}"
    state: new
  vars:
    prefix: 192.168.0.0/24

設定更新時に使えるquery_params

netbox_ip_addressは特に意識せずに使ってしまうと重複して登録ができてしまう場合があります
(VIPなど、複数DeviceにIPを紐付ける場合があったりするためそういった仕様なのかもしれないです)

それでは困る場合もありますが、そんな時に使えるのがquery_paramsです
ユニークなオブジェクトに対して処理を実行できます
使い方

- name: ip address assinge
   netbox.netbox.netbox_ip_address:
     netbox_url: "{{ netbox_url }}"
     netbox_token: "{{ netbox_token }}"
     data:
       address: "192.168.0.1/32"
       assigned_object:
          name: "Gi1/0/1"
          device: "device_a"
     query_params:
       - address

便利なnb_lookup

netboxのcollectionにはlookup pluginも用意されています
めちゃめちゃ便利なnb_lookupを紹介します

使い方

- name: fetch prefixes
   set_fact:
      prefixes: "{{ q('netbox.netbox.nb_lookup', 'prefixes',
                             api_endpoint=netbox_url,
                             api_filter=filter_value,
                             token=netbox_token)}}"
    vars:
      filter_value: 'mask_length=24'

prefixes の部分は使えるkeywordが決まっている、書き換えるといろいろなリソースにアクセスすることができる
`api_filter‘はクエリする際のパラメータ部分になります

上記例では/24のPrefixのみを取得できる
ちなみに、パラメータを増やす際はスペースで区切る

実行するとkeyとvalueが返ってくる、valueの中に細かい情報が入っています
f:id:usage_automate:20210426213527p:plain

nb_lookupで使えるkeyword

  • aggregates
  • circuit-terminations
  • circuit-types
  • circuits
  • circuit-providers
  • cables
  • cluster-groups
  • cluster-types
  • clusters
  • config-contexts
  • console-connections
  • console-ports
  • console-server-port-templates
  • console-server-ports
  • device-bay-templates
  • device-bays
  • device-roles
  • device-types
  • devices
  • export-templates
  • front-port-templates
  • front-ports
  • graphs
  • image-attachments
  • interface-connections
  • interface-templates
  • interfaces
  • inventory-items
  • ip-addresses
  • manufacturers
  • object-changes
  • platforms
  • power-connections
  • power-outlet-templates
  • power-outlets
  • power-port-templates
  • power-ports
  • prefixes
  • rack-groups
  • rack-reservations
  • rack-roles
  • racks
  • rear-port-templates
  • rear-ports
  • regions
  • reports
  • rirs
  • roles
  • secret-roles
  • secrets
  • services
  • sites
  • tags
  • tenant-groups
  • tenants
  • topology-maps
  • virtual-chassis
  • virtual-machines
  • virtualization-interfaces
  • vlan-groups
  • vlans
  • vrfs

github.com

まとめ

何かと便利なNetboxですがAnsibleで操作するさいに忘れがちなことをまとめてみました。

※ダイナミックインベントリは試せてないのでまたいつか・・

AnsibleのXMLモジュールお試ししてみた

XMLモジュールお試ししたい

NW機器は何かとXMLを使うことがあります (ACIやPaloaltoなど)

お勉強がてらにAnsibleでXMLを操作を試してみます
xmlのファイルから対象の情報を抜き取ることがゴールです。

下準備

collectionのダウンロード

community.general 2.4.0

pythonライブラリのダウンロード

lxml==4.6.3

サンプルPlaybook

下記XPathの紹介ページからコピペしてきた、XMLxml_dataに格納しています

https://www.w3schools.com/xml/xpath_nodes.asp

---
- hosts: localhost
  connection: local
  gather_facts: false
  vars:
    xml_data: |
      <?xml version="1.0" encoding="UTF-8"?>
      <bookstore>
        <book>
          <title lang="en">Harry Potter</title>
          <author>J K. Rowling</author>
          <year>2005</year>
          <price>29.99</price>
        </book>
      </bookstore>

  tasks:
    - name: community.general.xml
      community.general.xml:
        xmlstring: "{{ xml_data }}"
        xpath: /bookstore/book/title
        content: text
      register: hits

    - name: debug
      ansible.builtin.debug:
        msg: "{{ hits }}"

community.general.xmlモジュールを利用します、変数でxmlを渡すときはxmlstringを利用します。
xmlファイルを直接開きたい場合はpathで対象のxmlファイルを選択します

xpathで抽出したいデータがある階層を指定し、 contentをtextにし<title></title>で囲われているTextを抜き出します。

<title lang="en">Harry Potter</title>

実行結果はhits に格納します

実行

実行してみます

f:id:usage_automate:20210414221636p:plain 成功しました
community.general.xmlの実行結果はmatchesに含まれるようでしたのでPlaybook微修正して余計な出力を減らします

    - name: debug
      ansible.builtin.debug:
        msg: "{{ hits.matches }}"

再度実行してみます

f:id:usage_automate:20210414221215p:plain

想定通りに動きました。

genie dqのcustom_filter自作してみた

ansible.utils.cli_parseで出力した辞書から任意のkeyだったりvalueだったりを取り出すのにgenieのdqを使ってみたくなりました
実装するには自分でcustom_filter作るしかなかったので試してみました

Dqの説明は以下

公式ドキュメント
https://pubhub.devnetcloud.com/media/genie-docs/docs/userguide/utils/index.html

環境

ansible 2.10.7
genie 21.2.3

参考にしたGithub

こちらのfilter_pluginを参考に作成しました github.com

filter_dq.pyというスクリプトを作成しました

from __future__ import absolute_import, division, print_function
__metaclass__ = type

from ansible.module_utils.six import PY3
from ansible.errors import AnsibleError, AnsibleFilterError

try:
    from genie.utils import Dq
    HAS_GENIE = True
except ImportError:
    HAS_GENIE = False

class FilterModule(object):
    def __init__(self):
        if not PY3:
            raise AnsibleFilterError("Genie requires Python 3")

        if not HAS_GENIE:
            raise AnsibleFilterError("Genie not found. Run 'pip install genie'")

    def genie_dq_contains(self, output,value):
        try:
          parsed_output = Dq(output).contains(value).reconstruct()
        except Exception as e:
            raise AnsibleFilterError("DQ Error: {0}".format(e))

        if parsed_output:
            return parsed_output
        else:
            return None

~~ snip~~

    def filters(self):
        return {
            'genie_dq_contains': self.genie_dq_contains,
            'genie_dq_get_values': self.genie_dq_get_values,
            'genie_dq_contains_key_value': self.genie_dq_contains_key_value,
            'genie_dq_value_operator': self.genie_dq_value_operator,
        }

genie_dq_contrainsのメソッドにfilterとして呼び出された際の処理を記載しています、 filtersメソッドはfilter呼び出し時のkeywordを定義しています。

Playbookでこのgenie_dq_contrainsを呼び出すときは以下のようになります

"{{ res_show | genie_dq_contrains('route') }}"

res_showの変数が一番目の変数(output)として入り、valueは2番目の変数(value)としてfilterに渡されます
引き渡された変数はGenieのDqで特定のデータを抽出します

同じ要領で以下4つのメソッドを作成してみました 1. genie_dq_contains 2. genie_dq_get_values 3. genie_dq_contains_key_value 4. genie_dq_value_operator

それでは実際に動かしてみます

下準備

custom_filterを使うには ansible.cfgにfilterパスを追加する必要があります filter_pluginにcustom_filterが配置されているパスを定義します。

[defaults]
filter_plugins = filter_plugins

これで下準備は完了です

使い方

動作確認のため、以下のようなPlaybookを書きました
処理の内容としては、ansible.utils.cli_parseでshow ip routeを送信しparser pyatsでパースをします。
この時の戻り値をres_showに格納し、debugモジュールで表示する際にcustom_filterにかけていきます。

---
- hosts: ios01
  gather_facts: false

  tasks:
    - name: コマンド送信
      ansible.utils.cli_parse:
        command: show ip route
        parser:
            name: ansible.netcommon.pyats
      register: res_show

    - name: routeの一覧
      ansible.builtin.debug: 
        msg: "{{ res_show | genie_dq_get_values(value) }}"
      vars: 
        value: 'routes'
  
    - name: 対象のrouteの取得
      ansible.builtin.debug:
        msg: "{{ res_show | genie_dq_contains_key_value(key,value) }}"
      vars: 
        key: 'routes'
        value: "0.0.0.0/0"

    - name: 想定のNexthopのrouteをListにしてから対象のrouteを表示
      ansible.builtin.debug:
        msg: "{{ res_show | genie_dq_contains_key_value(key,value) | genie_dq_contains(route) }}"
      vars: 
        key: 'next_hop'
        value: "10.10.20.254"
        route: "0.0.0.0/0"

    - name: routeのpreference値が01のrouteのみ表示
      ansible.builtin.debug: 
        msg: "{{ res_show | genie_dq_value_operator(arg1,arg2,arg3) }}"
      vars: 
        arg1: 'route_preference'
        arg2: '=='
        arg3: '1'

実行対象はいつも通り、Devnetのalwaysonのリソースを使わせていただいています。

実行

さっそく実行してみます。 ログが長くなってしまったので、分割して結果について紹介していきます。

custom_filter_genie_dq# ansible-playbook -i inventory/hosts.ini dq_sample.yml 

PLAY [ios01] *************************************************************************************************************************************************

TASK [コマンド送信] ************************************************************************************************************************************************
ok: [ios01]

TASK [routeの一覧] **********************************************************************************************************************************************
ok: [ios01] => {
    "msg": [
        "0.0.0.0/0",
        "10.10.20.0/24",
        "10.10.20.48/32",
        "10.255.255.0/24",
        "10.255.255.1/32"
    ]
}

上記はgenie_dq_get_valuesで'route'のvalueをlistとして格納しています。
単純にルートの数などが知りたいときに使えるかなぁ

TASK [対象のrouteの取得] *******************************************************************************************************************************************
ok: [ios01] => {
    "msg": {
        "parsed": {
            "vrf": {
                "default": {
                    "address_family": {
                        "ipv4": {
                            "routes": {
                                "0.0.0.0/0": {
                                    "active": true,
                                    "metric": 0,
                                    "next_hop": {
                                        "next_hop_list": {
                                            "1": {
                                                "index": 1,
                                                "next_hop": "10.10.20.254",
                                                "outgoing_interface": "GigabitEthernet1"
                                            }
                                        }
                                    },
                                    "route": "0.0.0.0/0",
                                    "route_preference": 1,
                                    "source_protocol": "static",
                                    "source_protocol_codes": "S*"
                                }
                            }
                        }
                    }
                }
            }
        }
    }
}

続いてgenie_dq_contains_key_valueでkeyとvalueの組み合わせを指定しデータを抽出します
routeの中の0.0.0.0/0のデータのみ抜き出しています。
もちろん存在しない場合は空っぽで応答されます。

TASK [想定のNexthopのrouteをListにしてから対象のrouteを表示] *****************************************************************************************************************
ok: [ios01] => {
    "msg": {
        "parsed": {
            "vrf": {
                "default": {
                    "address_family": {
                        "ipv4": {
                            "routes": {
                                "0.0.0.0/0": {
                                    "next_hop": {
                                        "next_hop_list": {
                                            "1": {
                                                "next_hop": "10.10.20.254"
                                            }
                                        }
                                    }
                                }
                            }
                        }
                    }
                }
            }
        }
    }
}

続いてはgenie_dq_contains_key_valueとgenie_dq_containsの合わせ技になります genie_dq_contains_key_valueでnext_hopが10.10.20.254のデータのみを抽出し、その後
genie_dq_containsでrouteが0.0.0.0/0のものを抽出しています。 (| をつないで複数のfilterをつなぎ合わせることも可能ってのを見せたかった例)

TASK [routeのpreference値が01のrouteのみ表示] ************************************************************************************************************************
ok: [ios01] => {
    "msg": {
        "parsed": {
            "vrf": {
                "default": {
                    "address_family": {
                        "ipv4": {
                            "routes": {
                                "0.0.0.0/0": {
                                    "route_preference": 1
                                }
                            }
                        }
                    }
                }
            }
        }
    }
}

PLAY RECAP ***************************************************************************************************************************************************
ios01                      : ok=5    changed=0    unreachable=0    failed=0    skipped=0    rescued=0    ignored=0   

最後はgenie_dq_value_operatorです、
route_preferenceが1のデータのみ抽出しています

まとめ

はじめてcustom_filterを作成したが思ったよりも簡単に実装することができました。 パパっとできた割には結構柔軟に使えて便利なfilterになりました

なるべく既存のものを利用し、自分でガリガリ作らないほうがいいってポリシーなんですが
作ってみると楽しくて、これもcustom_filterでできそうだなと考えてしまう頭になってしまいそうです。

ただライセンス周りがいまいちわからず(このブログもダイジョブなんかなとか思ったり) githubで公開できるように勉強中です・・・ (詳しい方いたら教えてください・・・)