2021Ansible Advent Calendar21日目の記事です
RoutingのDiffを取りたい
ansibleでNW機器の設定変更を行った前後のルートの差分を見たい。こんな時どうしていますか? 取得した結果をシンプルに比較してしまうと、ルートのアップタイムが差分として表示され純粋に増えた/減った箇所が分かりにくい場合があります。
そこで、ansibleとntc-templates/カスタムフィルターなどを利用してルートの差分を取得する方法を紹介します。
まず、使ったものを動かすと下記のように、時間を除いたルートの増減のみを表示させることができます。
TASK [route diff (json)] ************************************************************************************************************
--- before
+++ after
@@ -9,0 +10 @@
+{'PROTOCOL': 'S', 'TYPE': '', 'NETWORK': '172.16.0.0', 'MASK': '24', 'DISTANCE': '1', 'METRIC': '0', 'NEXTHOP_IP': '10.9.0.1', 'NEXTHOP_IF': ''}

changed: [localhost]
※ この記事では、ntc-templateでパースした結果で差分を取得することを前提に考えます。
環境
filesにはshow ip routeの実行結果が格納されています。
templatesにはntc-templateのios_show_ip_route.textfsmとios_show_ip_route.textfsmを少しだけカスタムしたものを格納しています。
├── ansible.cfg
├── filter_plugins
│   └──  routediff.py
├── files
│   ├── after_ip_route.txt
│   └── before_ip_route.txt
├── templates
│   ├── ios_show_ip_route.textfsm
│   └── ios_show_ip_route_custom.textfsm
└── route_diff.yml
ansible.cfg
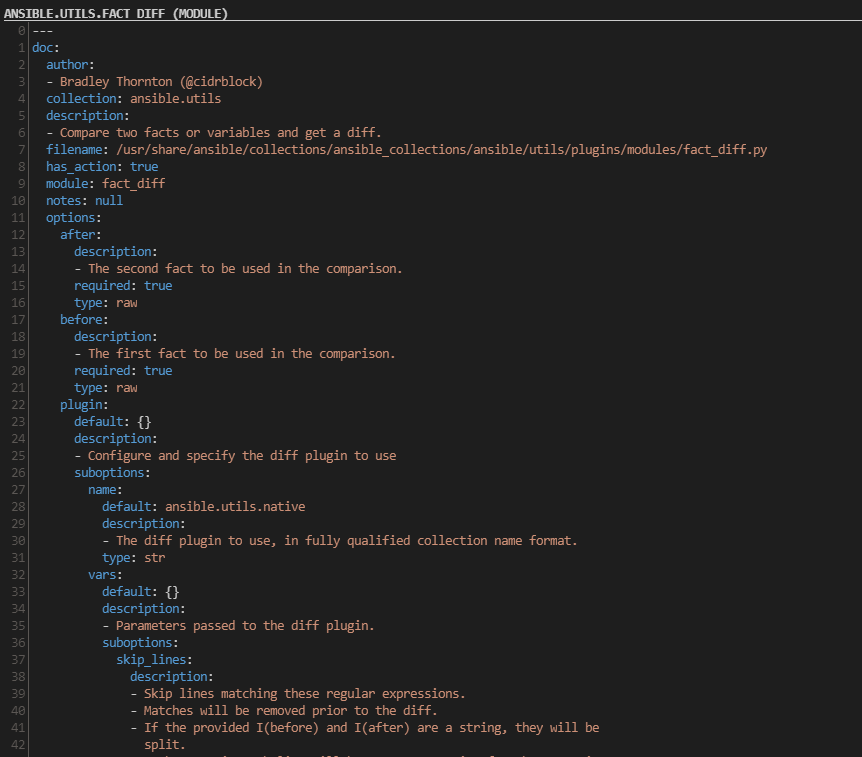
ansible.utils.fact_diffを利用するため、CONTEXTを0に設定します。 カスタムフィルタを使う方法もあるので、filter_pluginsに対象のパスを書きます
[diff]
CONTEXT = 0

[defaults]
filter_plugins = filter_plugins
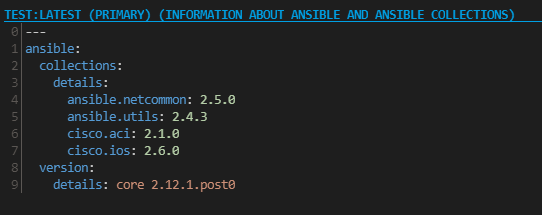
ansible [core 2.12.0]

Collection        Version
----------------- -------
ansible.netcommon 2.4.0
ansible.utils     2.4.2
何も考えずにDiffをした時の悩み
何も考えずにshow ip routeの出力結果が記載されているファイルを読み込んでfact_diffで差分を比較してみます。
- name: route diff (text)
  hosts: localhost
  gather_facts: false

  tasks:
    - name: route diff (text)
      ansible.utils.fact_diff:
        before: "{{ lookup('file', playbook_dir + '/files/before_ip_route.txt') }}"
        after: "{{ lookup('file', playbook_dir + '/files/after_ip_route.txt') }}"
実行結果
PLAY [route diff (text)] ********************************************************************************************************************************************************************************************

TASK [route diff (text)] ********************************************************************************************************************************************************************************************
--- before
+++ after
@@ -18 +18 @@
-O        10.2.0.0/24 [110/2] via 10.9.0.1, 00:00:03, GigabitEthernet0/0
+O        10.2.0.0/24 [110/2] via 10.9.0.1, 00:02:10, GigabitEthernet0/0
@@ -22 +22,3 @@
-L        10.100.0.2/32 is directly connected, GigabitEthernet0/2
\ No newline at end of file
+L        10.100.0.2/32 is directly connected, GigabitEthernet0/2
+      172.16.0.0/24 is subnetted, 1 subnets
+S        172.16.0.0 [1/0] via 10.9.0.1
\ No newline at end of file

changed: [localhost]
ルートは変わっていないのに、ダイナミックルーティングで登録されているルートは時間の部分が差分として表示されしまいます。
今回はルートが少ないですがルートが大量にあると時間の差分が大量に出てしまい、純粋に追加や削除になっているルートが分かりにくいですね。
出力が階層のようになってしまっているルートがある場合はもはや何が起きてるのか謎です
@@ -43,2 +44,2 @@
-           [110/20] via 10.62.4.29, 12:55:19, TenGigabitEthernet1/15
-           [110/20] via 10.62.3.29, 12:55:19, TenGigabitEthernet1/16
+           [110/20] via 10.62.4.29, 12:59:19, TenGigabitEthernet1/15
+           [110/20] via 10.62.3.29, 12:59:19, TenGigabitEthernet1/16
ルートの比較だけを取得する
それでは、ここからルート部分の比較をする方法を検討します。
- ntc-templatesをカスタムすればできらぁ!
- Jinja2で頑張ればできらぁ!
- Custom Filter使えばできらぁ!
1. ntc-templatesをカスタムすればできらぁ!
ntc-templatesでshow ip routeをパースした結果を利用して差分を比較します。 しかし、元のテンプレートだとUPTIMEといったデータも保存されるため、このまま比較してしまっては不要な差分が表示されてしまいます。
そこで、もともと存在していたValue UPTIMEをデータとして保存されにようにしてしまいましょう。
UPTIMEとしてマッチしてる正規表現
Value UPTIME (\d[\w:\.]+)
${UPTIME}をすべて\d[\w:\.]+に直接書き換え(乱暴)
カスタム済みテンプレートios_show_ip_route_custom.textfsm
Value Filldown PROTOCOL (\w)
Value Filldown TYPE (\w{0,2})
Value Required,Filldown NETWORK (\d{1,3}.\d{1,3}.\d{1,3}.\d{1,3})
Value Filldown MASK (\d{1,2})
Value DISTANCE (\d+)
Value METRIC (\d+)
Value NEXTHOP_IP (\d{1,3}.\d{1,3}.\d{1,3}.\d{1,3})
Value NEXTHOP_IF ([A-Z][\w\-\.:/]+)

Start
  ^Gateway.* -> Routes
  # Capture time-stamp if vty line has command time-stamping turned on
  ^Load\s+for\s+
  ^Time\s+source\s+is

Routes
  # For "is (variably )subnetted" line, capture mask, clear all values.
  ^\s+\d{1,3}.\d{1,3}.\d{1,3}.\d{1,3}\/${MASK}\sis -> Clear
  #
  # Match directly connected route with explicit mask
  ^${PROTOCOL}(\s|\*)${TYPE}\s+${NETWORK}\/${MASK}\sis\sdirectly\sconnected,\s${NEXTHOP_IF} -> Record
  #
  # Match directly connected route (mask is inherited from "is subnetted")
  ^${PROTOCOL}(\s|\*)${TYPE}\s+${NETWORK}\sis\sdirectly\sconnected,\s${NEXTHOP_IF} -> Record
  #
  # Match regular routes, with mask, where all data in same line
  ^${PROTOCOL}(\s|\*)${TYPE}\s+${NETWORK}\/${MASK}\s\[${DISTANCE}/${METRIC}\]\svia\s${NEXTHOP_IP}(,\s\d[\w:\.]+)?(,\s${NEXTHOP_IF})? -> Record
  #
  # Match regular route, all one line, where mask is learned from "is subnetted" line
  ^${PROTOCOL}(\s|\*)${TYPE}\s+${NETWORK}\s\[${DISTANCE}\/${METRIC}\]\svia\s${NEXTHOP_IP}(,\s\d[\w:\.]+)?(,\s${NEXTHOP_IF})? -> Record
  #
  # Match route with no via statement (Null via protocol)
  ^${PROTOCOL}(\s|\*)${TYPE}\s+${NETWORK}\/${MASK}\s\[${DISTANCE}/${METRIC}\],\s\d[\w:\.]+,\s${NEXTHOP_IF} -> Record
  #
  # Match "is a summary" routes (often Null0)
  ^${PROTOCOL}(\s|\*)${TYPE}\s+${NETWORK}\/${MASK}\sis\sa\ssummary,\s\d[\w:\.]+,\s${NEXTHOP_IF} -> Record
  #
  # Match regular routes where the network/mask is on the line above the rest of the route
  ^${PROTOCOL}(\s|\*)${TYPE}\s+${NETWORK}\/${MASK} -> Next
  #
  # Match regular routes where the network only (mask from subnetted line) is on the line above the rest of the route
  ^${PROTOCOL}(\s|\*)${TYPE}\s+${NETWORK} -> Next
  #
  # Match the rest of the route information on line below network (and possibly mask)
  ^\s+\[${DISTANCE}\/${METRIC}\]\svia\s${NEXTHOP_IP}(,\s\d[\w:\.]+)?(,\s${NEXTHOP_IF})? -> Record
  #
  # Match load-balanced routes
  ^\s+\[${DISTANCE}\/${METRIC}\]\svia\s${NEXTHOP_IP} -> Record
  #
  # Clear all variables on empty lines
  ^\s* -> Clearall

EOF
これを使ってパースすると、UPTIMEがパース後の結果に含まれなくなります。
(~snip~)
            {
                "DISTANCE": "110",
                "MASK": "24",
                "METRIC": "20",
                "NETWORK": "10.6.234.0",
                "NEXTHOP_IF": "Serial0/0/0:0",
                "NEXTHOP_IP": "10.64.4.90",
                "PROTOCOL": "O",
                "TYPE": "E2"
            },
(~snip~)
つまり、カスタムしたテンプレートを使ってパースした2つのshow ip routeの差分を見ると、ルートの増減のみ確認できます。
- name: Parse2(Change Textfsm)
  hosts: localhost
  gather_facts: false

  tasks:
    - name: parse (before)
      ansible.utils.cli_parse:
        text: "{{ lookup('file', playbook_dir + '/files/before_ip_route.txt') }}"
        parser:
          name: ansible.utils.textfsm
          template_path: "{{ playbook_dir }}/templates/ios_show_ip_route_custom.textfsm"
      register: parser_before_ip_route

    - name: parse (after)
      ansible.utils.cli_parse:
        text: "{{ lookup('file', playbook_dir + '/files/after_ip_route.txt') }}"
        parser:
          name: ansible.utils.textfsm
          template_path: "{{ playbook_dir }}/templates/ios_show_ip_route_custom.textfsm"
      register: parser_after_ip_route

    - name: route diff (json)
      ansible.utils.fact_diff:
        before: "{{ parser_before_ip_route.parsed }}"
        after: "{{ parser_after_ip_route.parsed }}"
実行
PLAY [Parse2(Change Textfsm)] *********************************************************************************************************
TASK [parse (before)] **************************************************************************************************************
ok: [localhost]
TASK [parse (after)] **************************************************************************************************************
ok: [localhost]
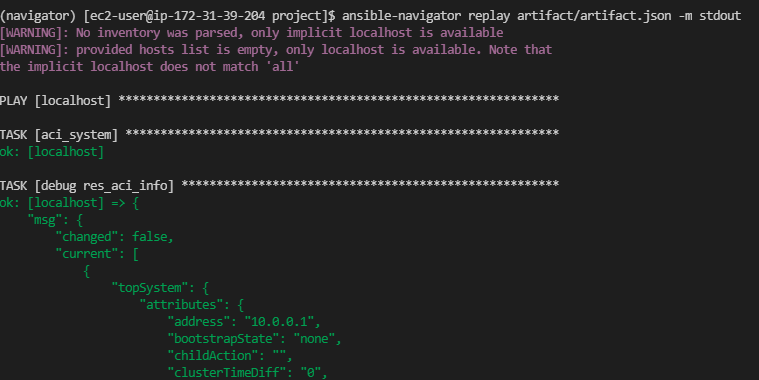
TASK [route diff (json)] ************************************************************************************************************
--- before
+++ after
@@ -9,0 +10 @@
+{'PROTOCOL': 'S', 'TYPE': '', 'NETWORK': '172.16.0.0', 'MASK': '24', 'DISTANCE': '1', 'METRIC': '0', 'NEXTHOP_IP': '10.9.0.1', 'NEXTHOP_IF': ''}
changed: [localhost]
これで、ルートの差分が取れました
元々あるテンプレートに手を入れる方法なので、変更点が分かりにくくなる。
これを許してしまうと無限にカスタムテンプレートが出来上がってしまう。といった課題はあるのものの手段として使えそうです。
2. Jinja2で頑張ればできらぁ!
続いて、Jinja2を使って同じことをする方法を紹介します。
Jinja2を使ってパースしてもよいのですが、ntc-templateでパースした構造化データのUPTIMEをjinja2で取り除き差分を取ります。
- name: Parse3(Jinja2)
  hosts: localhost
  gather_facts: false

  tasks:
    - name: parse before_ip_route
      ansible.utils.cli_parse:
        text: "{{ lookup('file', playbook_dir + '/files/before_ip_route.txt') }}"
        parser:
          name: ansible.utils.textfsm
          template_path: "{{ playbook_dir }}/templates/ios_show_ip_route.textfsm"
      register: parser_before_ip_route

    - name: parse after_ip_route
      ansible.utils.cli_parse:
        text: "{{ lookup('file', playbook_dir + '/files/after_ip_route.txt') }}"
        parser:
          name: ansible.utils.textfsm
          template_path: "{{ playbook_dir }}/templates/ios_show_ip.textfsm"
      register: parser_after_ip_route


    - name: set_fact
      set_fact:
        fact_parser_before_ip_route: |
          {% set _ = [] %}
          {% for i in parser_before_ip_route.parsed %}
          {% set __ = i.pop('UPTIME') %}
          {% set _ = _.append(i) %}
          {% endfor %}
          {{ _ }}
        fact_parser_after_ip_route: |
          {% set _ = [] %}
          {% for i in parser_after_ip_route.parsed %}
          {% set __ = i.pop('UPTIME') %}
          {% set _ = _.append(i) %}
          {% endfor %}
          {{ _ }}

    - name: route diff (json)
      ansible.utils.fact_diff:
        before: "{{ fact_parser_before_ip_route_simple }}"
        after: "{{ fact_parser_after_ip_route_simple }}"
ちょっと無茶しやがって。。感がありますが、単純にpopでUPTIMEを取り除いた結果を再格納しています。
PLAY [Parse3(Jinja2)] ***********************************************************************************************************************************************************************************************

TASK [parse before_ip_route] *********************************************************************************************************************************************************************************
ok: [localhost]

TASK [parse after_ip_route] **********************************************************************************************************************************************************************************
ok: [localhost]

TASK [set_fact] *****************************************************************************************************************************************************************************************************
ok: [localhost]

TASK [route diff (json)] ************************************************************************************************************
--- before
+++ after
@@ -9,0 +10 @@
+{'PROTOCOL': 'S', 'TYPE': '', 'NETWORK': '172.16.0.0', 'MASK': '24', 'DISTANCE': '1', 'METRIC': '0', 'NEXTHOP_IP': '10.9.0.1', 'NEXTHOP_IF': ''}

changed: [localhost]
Playbookでの工夫で回避できるので、一番簡単な方法かもしれません。
ただJinja2をべた書きされていると、Playbookの可読性が下がってしまいますね。
3. Custom Filter使えばできらぁ!
最後に、カスタムフィルターを使った方法を紹介します。
やっている内容1・2と同じく、ntc-templateでパースされたデータからUPTIMEを取り除いているだけです。
#!/usr/bin/python

class FilterModule(object):
  def pop_uptime(self, input_value):
    output = list()
    for i in input_value:
      i.pop('UPTIME')
      output.append(i)
    return output

  def filters(self):
      return {
          'pop_uptime': self.pop_uptime,
      }
複雑な処理は裏に隠してしまおうといったイメージですね。カスタムフィルターを使うと柔軟性は跳ね上がります。
例えばsortなどしたい!と思ったときにはカスタムフィルターの機能を追加すれば対応できます。
今回は限定的な処理なので、role化しfilter_pluginsディレクトリにおいて管理するほうがいいかなぁと思います。
pop_uptimeの利用
~(parseは省略)~
- name: route diff (diff)
  ansible.utils.fact_diff:
    before: "{{ parser_before_ip_route.parsed \
                             | pop_uptime() }}"
    after: "{{ parser_after_ip_route.parsed \
                             | pop_uptime() }}"
利用方法がとてもシンプルになります。 カスタムフィルターを作成/メンテする必要があり、Pythonを書けないと作れないのが課題ですかね。
ここがむずいよ
最初はテキストから単純に時間の部分をreplaceすればいいかな?と考えていたんですが、思ったよりも面倒でした。
時間の表記方法が多彩
多分基本形
O 172.20.1.1 [110/11] via 194.0.0.2, 00:05:45, FastEthernet0/0.100
日付(d)と時間(h)パターン
O E2 4.4.0.0 [110/20] via 194.0.0.2, 1d18h, FastEthernet0/0.100
え!?改行!?
B       6.6.0.0 [200/0] via 195.0.0.1, 00:00:04
     172.16.0.0/26 is subnetted, 1 subnets
すべてのパターンに対応するように正規表現を書いてreplaceすれば、時間部分を消した情報で比較もできると思いましたが、大変そうだったのでやめました。
まとめ
多少強引ではあったものの、ルートの差分をとることができました。
テンプレートのカスタム、Jinja2、カスタムフィルターと違ったアプローチで紹介しました。
個人的にはカスタムフィルターが好きです。
差分がないことを確認したい場合は紹介した内容がそのまま使えるのではないでしょうか。
ただ、出力された差分が想定通りであるか?の確認をする場合は追加の検討が必要です。時間があるときそちらの検討もしたいと思います。
本記事は、辞書から特定のキーを抜き出すことがポイントになっています。
下記の記事でも紹介がされています。
利用した出力結果
after_ip_route.txt
Codes: L - local, C - connected, S - static, R - RIP, M - mobile, B - BGP
       D - EIGRP, EX - EIGRP external, O - OSPF, IA - OSPF inter area
       N1 - OSPF NSSA external type 1, N2 - OSPF NSSA external type 2
       E1 - OSPF external type 1, E2 - OSPF external type 2
       i - IS-IS, su - IS-IS summary, L1 - IS-IS level-1, L2 - IS-IS level-2
       ia - IS-IS inter area, * - candidate default, U - per-user static route
       o - ODR, P - periodic downloaded static route, H - NHRP, l - LISP
       a - application route
       + - replicated route, % - next hop override, p - overrides from PfR

Gateway of last resort is not set

      10.0.0.0/8 is variably subnetted, 9 subnets, 3 masks
C        10.0.10.0/31 is directly connected, GigabitEthernet0/3
L        10.0.10.0/32 is directly connected, GigabitEthernet0/3
C        10.1.0.0/24 is directly connected, GigabitEthernet0/1
L        10.1.0.1/32 is directly connected, GigabitEthernet0/1
O        10.2.0.0/24 [110/2] via 10.9.0.1, 00:02:10, GigabitEthernet0/0
C        10.9.0.0/31 is directly connected, GigabitEthernet0/0
L        10.9.0.0/32 is directly connected, GigabitEthernet0/0
C        10.100.0.0/24 is directly connected, GigabitEthernet0/2
L        10.100.0.2/32 is directly connected, GigabitEthernet0/2
      172.16.0.0/24 is subnetted, 1 subnets
S        172.16.0.0 [1/0] via 10.9.0.1
before_ip_route.txt
Codes: L - local, C - connected, S - static, R - RIP, M - mobile, B - BGP
       D - EIGRP, EX - EIGRP external, O - OSPF, IA - OSPF inter area
       N1 - OSPF NSSA external type 1, N2 - OSPF NSSA external type 2
       E1 - OSPF external type 1, E2 - OSPF external type 2
       i - IS-IS, su - IS-IS summary, L1 - IS-IS level-1, L2 - IS-IS level-2
       ia - IS-IS inter area, * - candidate default, U - per-user static route
       o - ODR, P - periodic downloaded static route, H - NHRP, l - LISP
       a - application route
       + - replicated route, % - next hop override, p - overrides from PfR

Gateway of last resort is not set

      10.0.0.0/8 is variably subnetted, 9 subnets, 3 masks
C        10.0.10.0/31 is directly connected, GigabitEthernet0/3
L        10.0.10.0/32 is directly connected, GigabitEthernet0/3
C        10.1.0.0/24 is directly connected, GigabitEthernet0/1
L        10.1.0.1/32 is directly connected, GigabitEthernet0/1
O        10.2.0.0/24 [110/2] via 10.9.0.1, 00:00:03, GigabitEthernet0/0
C        10.9.0.0/31 is directly connected, GigabitEthernet0/0
L        10.9.0.0/32 is directly connected, GigabitEthernet0/0
C        10.100.0.0/24 is directly connected, GigabitEthernet0/2
L        10.100.0.2/32 is directly connected, GigabitEthernet0/2