本記事はエーピーコミュニケーションズ Advent Calendar 2020の11日目の記事です。
qiita.com
pyATSについて
pyATSはCisco社製のテスト自動化ソリューションです。
pythonで書かれたOSSです。
細い情報は以下も参考にしていただければと思います。
インストール編
usage-automate.hatenablog.com
Testbed編
usage-automate.hatenablog.com
pyATS/genieを組み込んだスクリプトを作成してみました
勉強のために、作ったスクリプトを2つほどお見せいたします。(スクリプト部分が多いです)
pyATS利用イメージの助けになれば幸いです(あまりスクリプトに組み込むことはないかもですが)
Testbedファイルは以下を作成し利用しました(CiscoのSnadboxで常時解放されているIOS-XE,IOS-XR)
---
devices:
  csr1000v-1:
      alias: xe1
      credentials:
        default:
          username: developer
          password: C1sco12345
      connections:
        vty:
          protocol: ssh
          ip: ios-xe-mgmt-latest.cisco.com
      os: iosxe
      type: iosxe
  TEST-CONV:
    credentials:
      default:
        username: admin
        password: C1sco12345
    connections:
      vty:
        protocol: ssh
        ip: sbx-iosxr-mgmt.cisco.com
        port: 8181
    os: iosxr
    type: iosxr
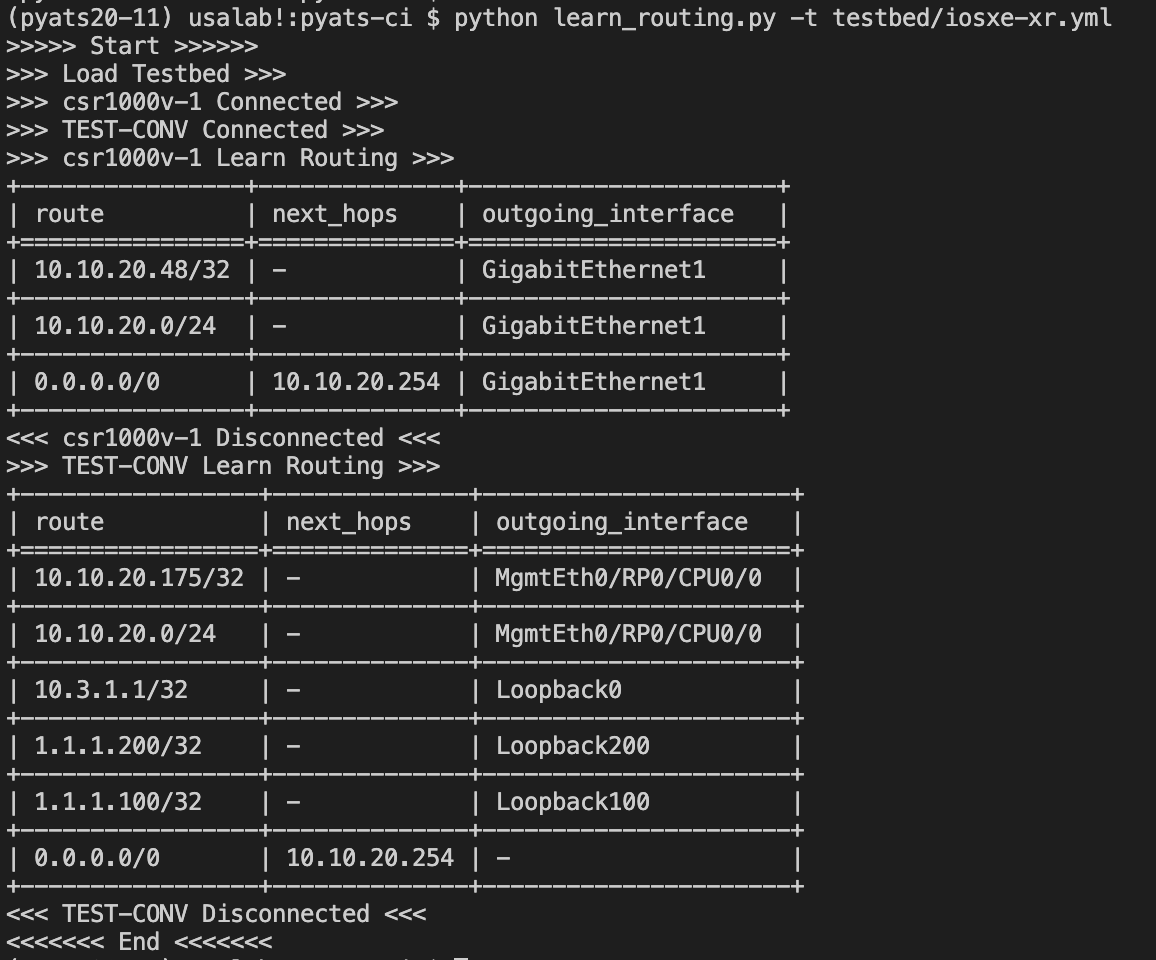
[1] Routing取得(Leanの利用)
Testbedファイルに定義したデバイスのRoutingを取得し表示させます。
え?普通に機器入ってコマンド打てば良いじゃんって?それは言わないお約束
実行結果
作成した、Scriptの解説をしていきます。
内容としてはpyATS/genieのLeanメソッドを利用して、Routing情報を取得と整形、表示をやっているだけになります。
まずpyATS/genieを利用するためにgenie.conf.Genieをスクリプト内にimportします。
from genie.conf import Genie
まず最初にGenie.initを呼び出しTestbedをLoadします。
try:
testbed = Genie.init(testbed)
print(">>> Load Testbed >>>")
except TypeError:
print('Testbed Load Error[001]')
sys.exit(1)
testbed.connectでDeviceに接続します。
接続にはUniconライラブリを利用しています。
try:
testbed.connect(log_stdout=False)
for device in testbed.devices.keys():
if testbed.devices[device].is_connected():
print(f">>> {device} Connected >>>")
except unicon.core.errors.ConnectionError:
print('Connection Error[002]')
sys.exit(1)
pyATS/genieのleanメソッドを利用して、Routing情報を取得します。
 Cisco DevNet: APIs, SDKs, Sandbox, and Community for Cisco Developers
今回対象のIOS-XEでは下記コマンド
- show ip route
- show ip route vrf
- show ipv6 route updated
- show ipv6 route vrf updated
IOS-XRでは下記コマンドを実行し、実行結果が.infoに格納されます。
XEとXRで微妙にRoutingを確認するコマンドが違いますが、learn('routing')をすると、.infoには同様の構成の辞書(dict)で情報が格納されます。
print(f">>> {device} Learn Routing >>>")
lean_routing = testbed.devices[device].learn('routing')
routes = lean_routing.info['vrf']['default']['address_family']['ipv4']['routes']
learn('routing')の実行結果から、Route/NextHop/Interfaceの情報のみ抜き出し、tabulateを利用し表として出力させます。
NexthopがないRouteなど、実行結果によって微妙に値に引っ張りかたが変わったのがつまづきポイントでした。
for route in routes.keys():
if 'next_hop_list' in list(routes[route]['next_hop'].keys()):
routes_list.append(routes[route]['route'])
next_hops_list.append(routes[route]['next_hop']['next_hop_list'][1]['next_hop'])
if 'outgoing_interface' in list(routes[route]['next_hop']['next_hop_list'][1].keys()):
outgoing_interface_list.append(routes[route]['next_hop']['next_hop_list'][1]['outgoing_interface'])
else:
outgoing_interface_list.append('-')
else:
for interface in list(routes[route]['next_hop']['outgoing_interface'].keys()):
routes_list.append(routes[route]['route'])
next_hops_list.append('-')
outgoing_interface_list.append(routes[route]['next_hop']['outgoing_interface'][interface]['outgoing_interface'])
headers = ["route", "next_hops","outgoing_interface"]
table = [routes_list, next_hops_list, outgoing_interface_list]
result = tabulate.tabulate(np.array(table).transpose(), headers,tablefmt="grid")
print(result)
最後にDeviceからログアウトして処理を終了させています。
print(f"<<< {device} Disconnected <<<")
testbed.devices[device].disconnect()
作成したpythonのスクリプト(全行)
from genie.conf import Genie
import unicon
import tabulate
import click
import sys
import numpy as np
@click.command()
@click.option('-t','--testbed',type=str,required=True)
def main(testbed):
print(">>>>> Start >>>>>>")
try:
testbed = Genie.init(testbed)
print(">>> Load Testbed >>>")
except TypeError:
print('Testbed Load Error[001]')
sys.exit(1)
try:
testbed.connect(log_stdout=False)
for device in testbed.devices.keys():
if testbed.devices[device].is_connected():
print(f">>> {device} Connected >>>")
except unicon.core.errors.ConnectionError:
print('Connection Error[002]')
sys.exit(1)
for device in testbed.devices.keys():
routes_list = list()
next_hops_list = list()
outgoing_interface_list = list()
print(f">>> {device} Learn Routing >>>")
lean_routing = testbed.devices[device].learn('routing')
routes = lean_routing.info['vrf']['default']['address_family']['ipv4']['routes']
for route in routes.keys():
if 'next_hop_list' in list(routes[route]['next_hop'].keys()):
routes_list.append(routes[route]['route'])
next_hops_list.append(routes[route]['next_hop']['next_hop_list'][1]['next_hop'])
if 'outgoing_interface' in list(routes[route]['next_hop']['next_hop_list'][1].keys()):
outgoing_interface_list.append(routes[route]['next_hop']['next_hop_list'][1]['outgoing_interface'])
else:
outgoing_interface_list.append('-')
else:
for interface in list(routes[route]['next_hop']['outgoing_interface'].keys()):
routes_list.append(routes[route]['route'])
next_hops_list.append('-')
outgoing_interface_list.append(routes[route]['next_hop']['outgoing_interface'][interface]['outgoing_interface'])
headers = ["route", "next_hops","outgoing_interface"]
table = [routes_list, next_hops_list, outgoing_interface_list]
result = tabulate.tabulate(np.array(table).transpose(), headers,tablefmt="grid")
print(result)
print(f"<<< {device} Disconnected <<<")
testbed.devices[device].disconnect()
print("<<<<<<< End <<<<<<<")
if __name__ == '__main__':
main()
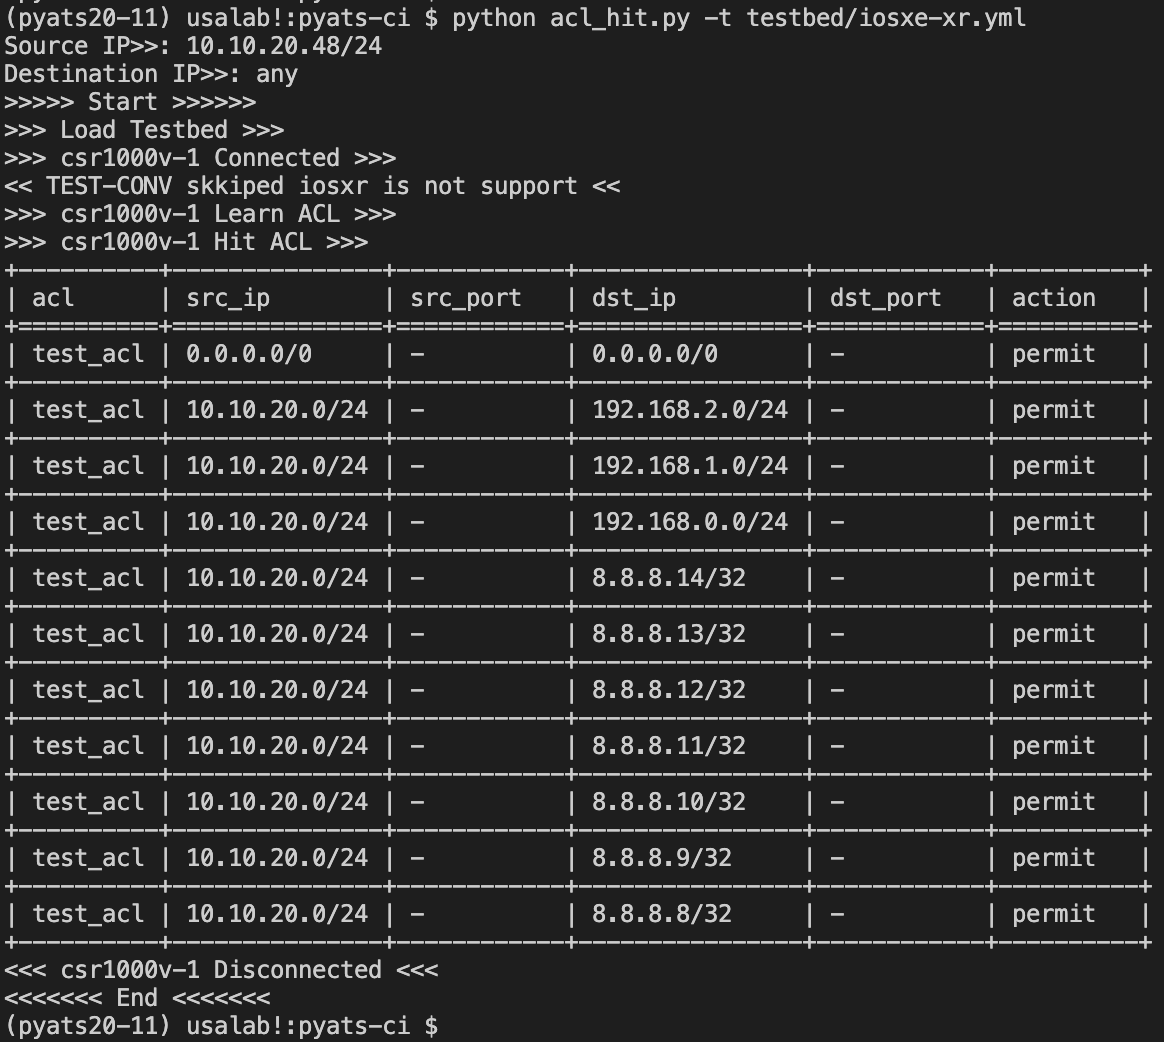
[2] ACL確認用Script
続いて、SourceIPとDestination IPを入力すると該当のACLがHitするScriptを作成しました。
こちらはlearn('acl')を利用しています。
learn('acl')は現状はXEのみ対応しています。
実行結果①
実行結果②
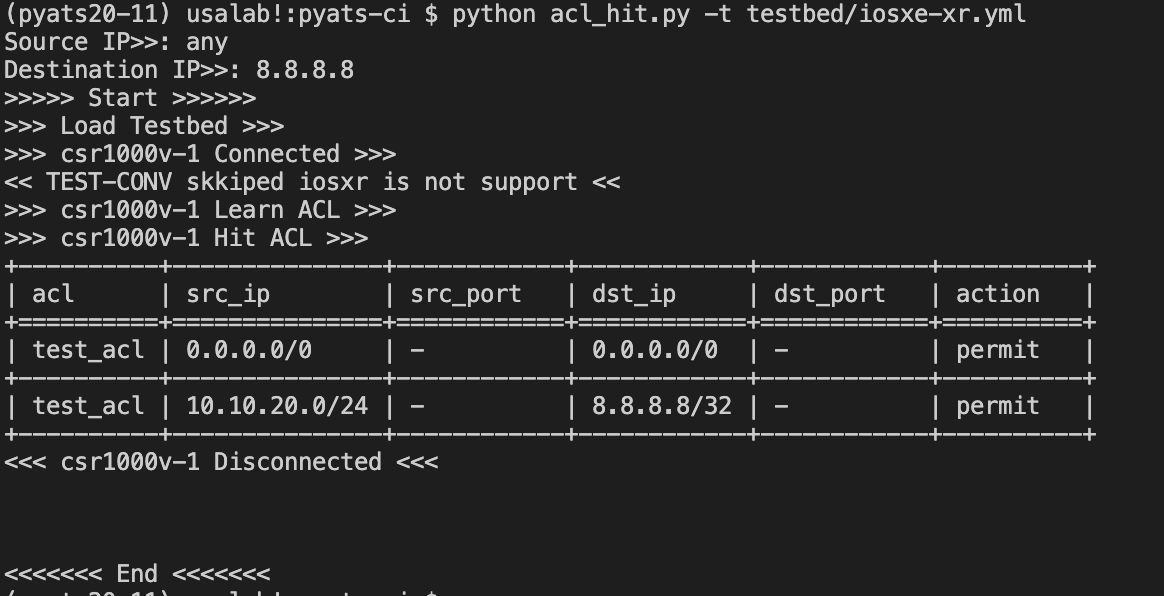
pythonの標準モジュールのipaddressを利用して、検索対象が含まれるIPを抽出しHitしたACLのみを表として表示させました。
leanメソッドで辞書になっているため、値の取り出し方を覚えれば応用は簡単にできます。
今回はlearnを利用しましたが、parseを利用する場合は特定の値を抜き出すためにDqと呼ばれるメソッドも用意されているようです。
ACLが適当すぎたので、少し反省しつつも想定どおりに動いてくれました。
from genie.conf import Genie
import re
import unicon
import tabulate
import click
import sys
import numpy as np
import ipaddress
def format_ipaddress(ipv4_net):
if ipv4_net == 'any':
ipv4_net = ipaddress.ip_network('0.0.0.0/0')
elif re.search('host', str(ipv4_net)) is not None:
ipv4_net = ipaddress.ip_network(ipv4_net.replace('host ',''))
else:
ipv4_net = ipaddress.ip_network(ipv4_net.replace(' ','/'))
return ipv4_net
@click.command()
@click.option('-t','--testbed',type=str,required=True)
@click.option('-sip','--source_ip_address',type=str,prompt='Source IP>>')
@click.option('-dip','--destination_ip_address',type=str,prompt='Destination IP>>')
def main(testbed,source_ip_address,destination_ip_address):
print(">>>>> Start >>>>>>")
try:
if source_ip_address == 'any':
search_source_ipaddress = ipaddress.ip_network('0.0.0.0/0')
else:
search_source_ipaddress = ipaddress.ip_network(source_ip_address,strict=False)
if destination_ip_address == 'any':
search_destination_ipaddress = ipaddress.ip_network('0.0.0.0/0')
else:
search_destination_ipaddress = ipaddress.ip_network(destination_ip_address,strict=False)
except TypeError or ValueError:
print('IPaddress Load Error[001]')
sys.exit(1)
try:
testbed = Genie.init(testbed)
print(">>> Load Testbed >>>")
except TypeError:
print('Testbed Load Error[002]')
sys.exit(1)
try:
for device in testbed.devices.keys():
if testbed.devices[device].os == 'iosxe':
testbed.connect(log_stdout=False)
if testbed.devices[device].is_connected():
print(f">>> {device} Connected >>>")
else:
print(f"<< {device} skkiped {testbed.devices[device].os} is not support <<")
except unicon.core.errors.ConnectionError:
print('Connection Error[003]')
sys.exit(1)
for device in testbed.devices.keys():
acl_list = list()
source_list = list()
destination_list = list()
src_port_list = list()
dst_port_list =list()
action_list =list()
if testbed.devices[device].os == 'iosxe':
print(f">>> {device} Learn ACL >>>")
lean_acls = testbed.devices[device].learn('acl')
acl_name_list = list(lean_acls.info['acls'].keys())
for acl in acl_name_list:
if 'aces' in lean_acls.info['acls'][acl].keys():
aces = lean_acls.info['acls'][acl]['aces']
for ace in aces.keys():
destination_ipv4_network = aces[ace]['matches']['l3']['ipv4']['destination_ipv4_network']
source_ipv4_network = aces[ace]['matches']['l3']['ipv4']['source_ipv4_network']
for dst_ipv4_net,src_ipv4_net in zip(destination_ipv4_network.keys(),source_ipv4_network.keys()):
dst_ipv4_net = format_ipaddress(dst_ipv4_net)
src_ipv4_net = format_ipaddress(src_ipv4_net)
if search_destination_ipaddress.subnet_of(dst_ipv4_net) or search_source_ipaddress.subnet_of(src_ipv4_net):
acl_list.append(lean_acls.info['acls'][acl]['name'])
source_list.append(src_ipv4_net)
src_port_list.append('-')
destination_list.append(dst_ipv4_net)
dst_port_list.append('-')
action_list.append(aces[ace]['actions']['forwarding'])
headers = ["acl", "src_ip","src_port","dst_ip","dst_port","action"]
table = [acl_list, source_list, src_port_list,destination_list,dst_port_list,action_list]
result = tabulate.tabulate(np.array(table).transpose(), headers,tablefmt="grid")
print(f">>> {device} Hit ACL >>>")
print(result)
print(f"<<< {device} Disconnected <<<")
testbed.devices[device].disconnect()
print("<<<<<<< End <<<<<<<")
if __name__ == '__main__':
main()
ACLをプロトコルを全部IPにしてしまったので、source_portやdestination_portの情報が取れずなかったため、、
プロトコルをTCP/UDPに設定しているACLで検索する場合は改修が必要です(いつかやります)
振り返りと次回
今回、自作ScriptにpyATS/genieを組み込んでみました。
欲しい値をピンポイントで取得するには多少時間がかかってしまいましたが、半日も掛からずScriptができました。
物凄い簡単!とは言えませんでしたが、pythonを嗜んでいる方ならばそこまで時間がかからずにキャッチアップできると思います。
今度こそ、次回でJob書きます!


")
)")


)")